MongoDB Stitch

MongoDB 提供了一个无服务器平台,无需设置服务器基础架构即可快速构建应用程序。MongoDB Stitch 被设计为 MongoDB Atlas 的升级版本。它会自动集成与我们数据库的连接。Stitch 阐明了开发和实施过程。它通过忽略构建和部署我们的后端的要求来实现它。MongoDB 缝合可作为后端服务使用,它允许我们轻松配置数据身份验证、数据访问规则和服务。

MongoDB 缝合提供了可升级的基础架构设计来处理请求。它还协调服务和数据库交互。即,我们不需要在配置服务器等任务上花费时间和资源。
例如,我们可以使用 MongoDB Stitch 生成一个管道,允许我们通过 HTTP 服务使用 Stripe 接受付款,更新购买日期,并使用 Mailgun 服务发送确认电子邮件。
使用 Stitch UI 创建 Stitch 应用程序
第 1 步:转到https://www.mongodb.com/cloud/atlas 页面,并登录您的 Atlas 帐户。
第 2 步:现在,您必须创建一个集群以与您的 MongoDB Stitch 应用程序一起使用,请按照下列步骤操作:
- 单击左侧导航窗口中的Clusters按钮,然后单击Build New Cluster按钮。
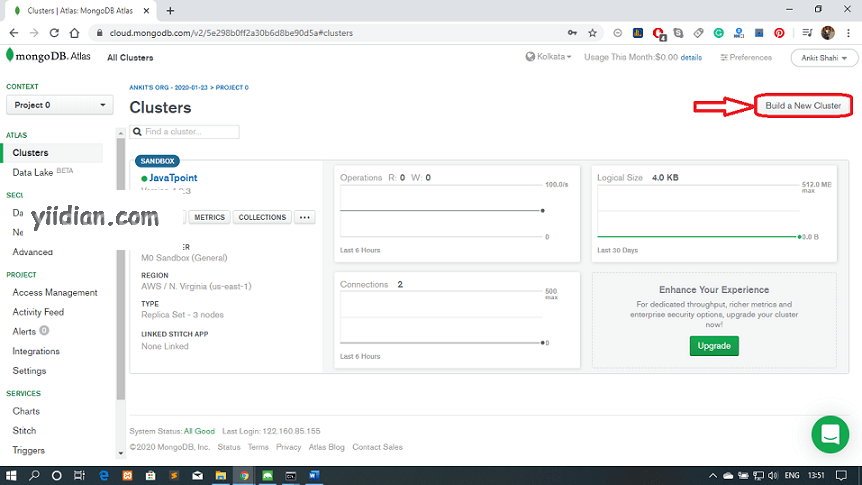
- 选择您的首选服务提供商、区域、层级和其他所需设置。

- 集群的名称默认为Cluster0。如果要更改集群的名称,则必须在这一步进行,因为集群名称一旦配置就无法更改。

- 最后,单击 Create Cluster 按钮保存所做的更改。
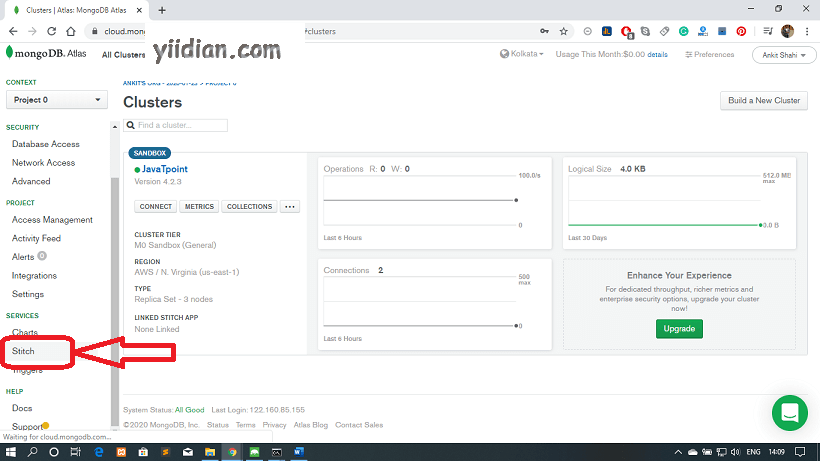
第 3 步:在MongoDB Atlas 中,单击左侧导航窗口中的Stitch Apps 。
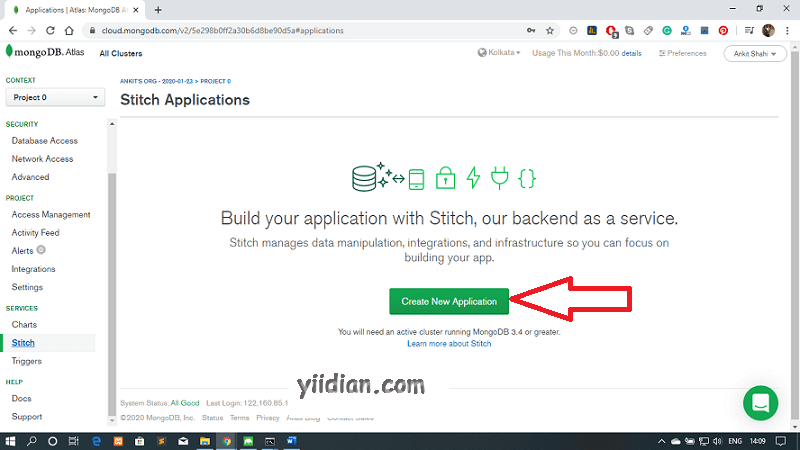
第 4 步:之后,单击“创建新应用程序”按钮。
第 5 步:在创建新应用程序弹出窗口中,输入 Stitch 应用程序的名称。
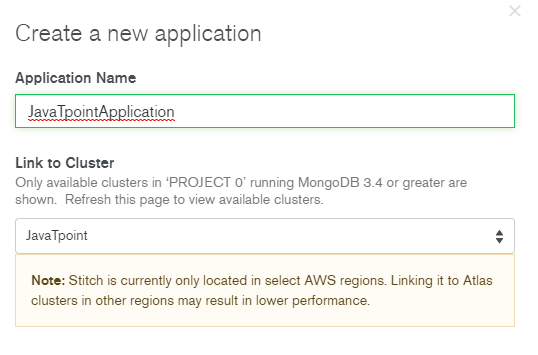
第 6 步:从Link to Cluster下拉对话框中选择项目中的集群。MongoDB Stitch 会自动创建一个链接到您的集群的MongoDB服务。

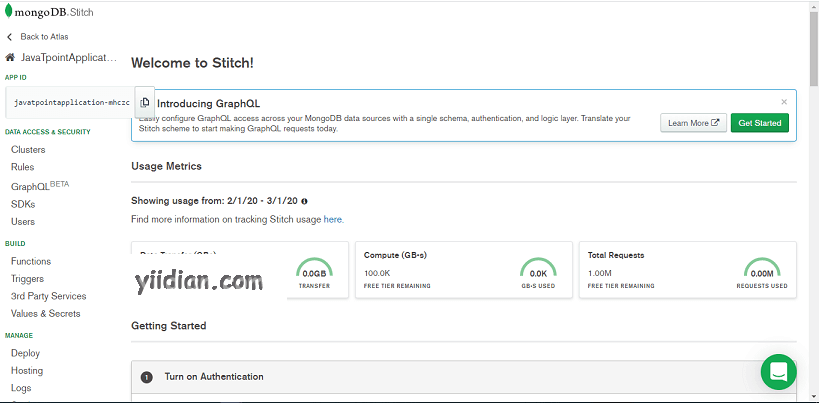
部署成功后会出现如下窗口。
使用 Stitch CLI 创建 Stitch 应用程序
第 1 步:首先,为您的应用程序创建一个新目录,并将一个stitch.json 文件添加到该目录的根目录。该文件必须包含一个空的JSON 对象。
第 2 步:使用API密钥通过 Atlas 验证 MongoDB Stitch 应用程序。
stitch-cli login --api-key=my-api-key --private-api-key=my-private-api-key
第 3 步:现在,使用“stitch-cli import”命令导入 Stitch CLI 库。
第 4 步:您应该验证您的应用程序是否已创建。
使用 Stitch 随时随地查询
使用 MongoDB 查询语言,我们可以直接从我们的客户端应用程序代码查询存储在 MongoDB 中的数据。MongoDB 集合的 Stitch 服务器允许我们使用基于登录用户或每个文档的内容的指定数据访问规则安全地过滤结果。
Student 集合包含描述示例拼贴中每个学生的文档。每份文件都包括学生的姓名、电子邮件、地址、费用和有关学生信息流的信息。在下面给出的示例中,我们比较了学生的所有文档集合,并将格式化的结果作为表格返回。
HTML 文件:
<!-- Base Stitch Browser SDK --> <script src="https://s3.amazonaws.com/stitch                      sdks/js/bundles/4.0.13/stitch.js"></script>

<div class="results-bar">
  <p>Count of Results:</p>
  <span id="num-results" class="results-bar__count"></span>
</div>
<table class="table table-striped">
  <thead class="thead">
    <tr>
      <th>Name</th>
      <th>Email</th>
      <th>Class</th>
      <th>Batch</th>
      <th>Fees</th>
    </tr>
  </thead>
  <tbody id='students'></tbody>
</table>
Java Script文件:
const {
  Stitch,
  RemoteMongoClient,
  UserPasswordCredential
} = stitch;

const stitchClient = Stitch.initializeDefaultAppClient("stitch-quickstarts-zhpox");

login("javatpoint@example.com", "password123").then(() => {
  // Initialize a MongoDB Service Client
  const mongodb = stitchClient.getServiceClient( RemoteMongoClient.factory,
    "mongodb-atlas");
  // Get a hook to the student collection
  const students = mongodb.db("Admin").collection("students");

  return students.find({}, {
    // limit: 2,
    // sort: { "fees": -1 }
  })
    .asArray();
})
  .then(displayStudents)

function login(email, password) {
  const credential = new UserPasswordCredential(email, password);
  return stitchClient.auth.loginWithCredential(credential);
}


// Renders the the students' information in the table
function displayStudents(students) {
  const employeesTableBody = document.getElementById("students");
  const numResultsEl = document.getElementById("num-results");
  const tableRows = students.map(student => {
    return '
      <tr>
        <td>${student.name.last}, ${student.name.first}</td>
        <td>${student.email}</td>
        <td>${student.role}</td>
        <td>${student.manager.name.first}${student.manager.name.last} (${student.admin.id || "no manager"})</td>
        <td>${student.fees}</td>
      </tr>
    ';
  });
  studentTableBody.innerHTML = tableRows.join("");
  numResultsEl.innerHTML = student.length;
}
使用规则保护数据
如果我们不想让每个学生都看到其他每个学生的数据,我们可以使用收集规则。我们可以使用它来控制所有用户都可以访问它的数据,而无需更改查询模式。
热门文章
优秀文章
