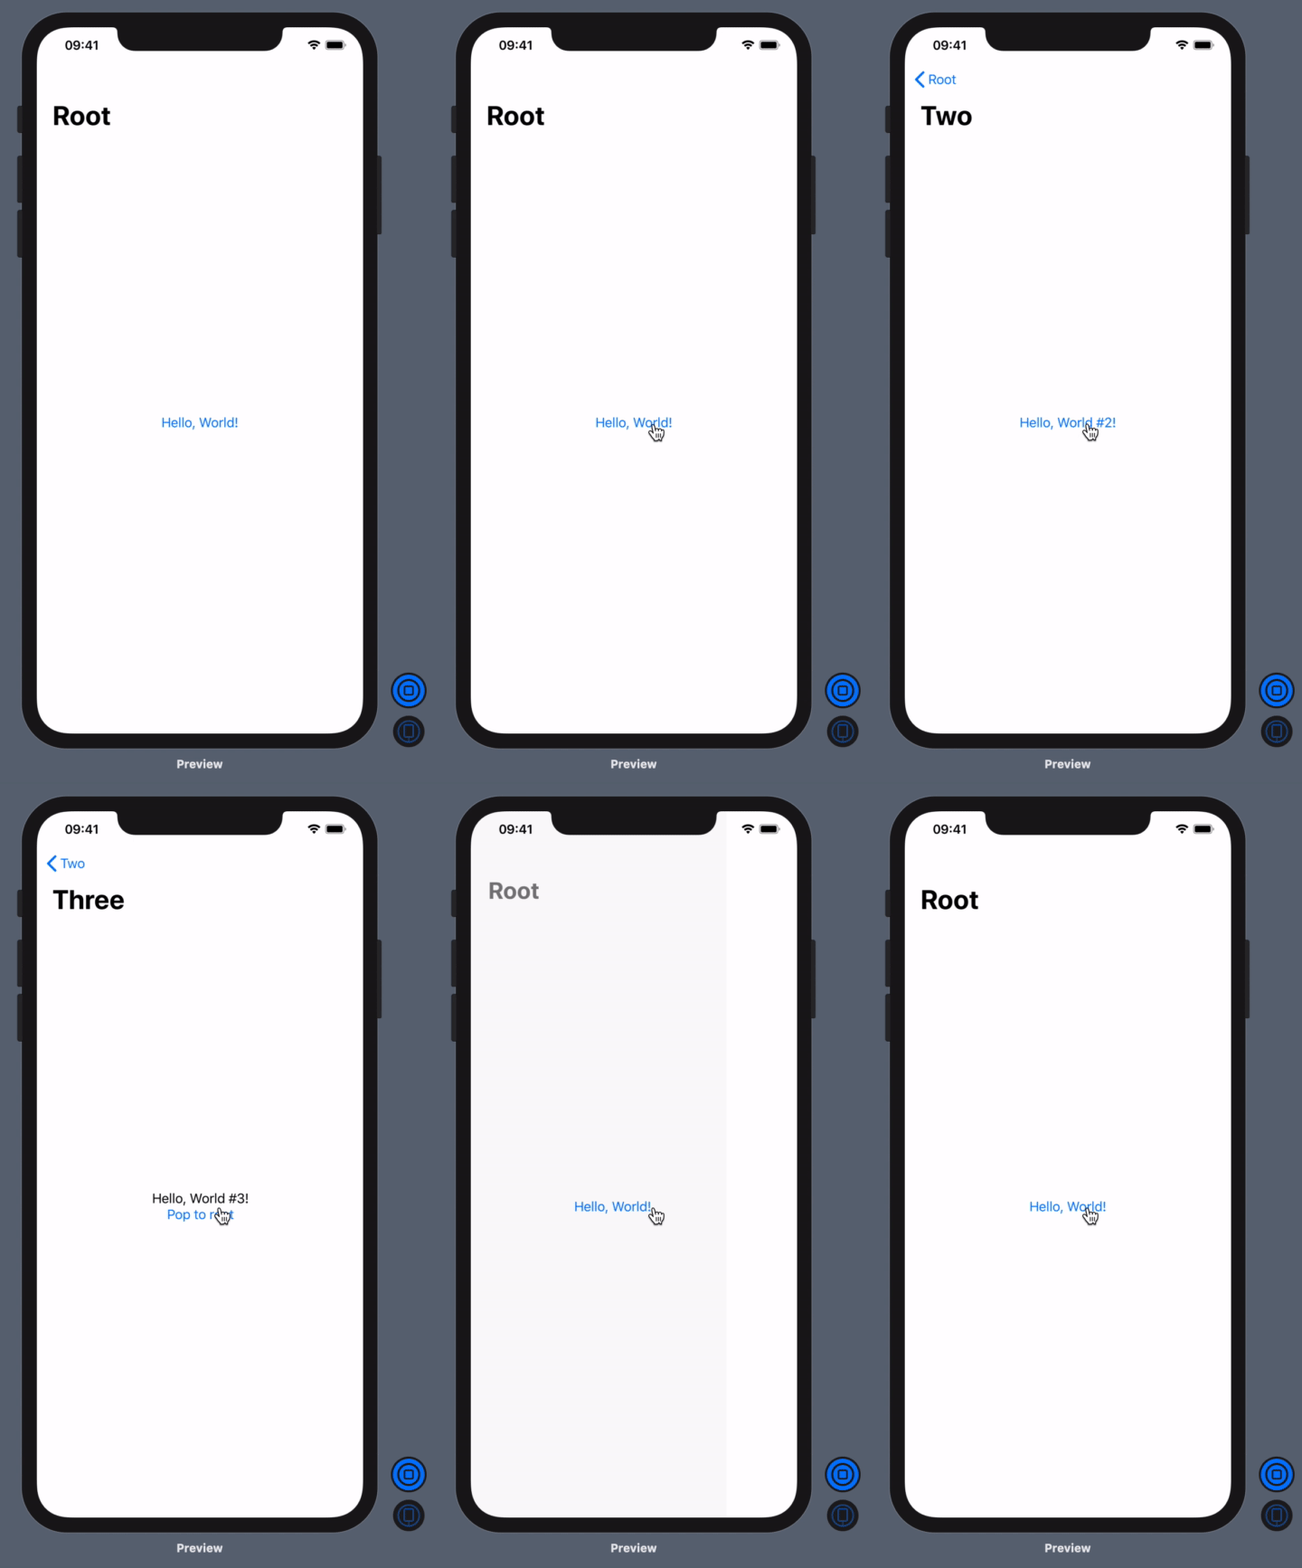

最后,使用Beta 5,我们可以通过编程方式弹出到父视图。然而,在我的应用程序中有几个地方,视图有一个“保存”按钮,它结束了一个多步骤的过程并返回到开始。在UIKit中,我使用popToRootViewController(),但我无法在SwiftUI中找到同样的方法。
下面是我试图实现的模式的一个简单例子。
我该怎么做?
import SwiftUI

struct DetailViewB: View {
    @Environment(\.presentationMode) var presentationMode: Binding<PresentationMode>
    var body: some View {
        VStack {
            Text("This is Detail View B.")

            Button(action: { self.presentationMode.value.dismiss() } )
            { Text("Pop to Detail View A.") }

            Button(action: { /* How to do equivalent to popToRootViewController() here?? */ } )
            { Text("Pop two levels to Master View.") }

        }
    }
}

struct DetailViewA: View {
    @Environment(\.presentationMode) var presentationMode: Binding<PresentationMode>
    var body: some View {
        VStack {
            Text("This is Detail View A.")

            NavigationLink(destination: DetailViewB() )
            { Text("Push to Detail View B.") }

            Button(action: { self.presentationMode.value.dismiss() } )
            { Text("Pop one level to Master.") }
        }
    }
}

struct MasterView: View {
    var body: some View {
        VStack {
            Text("This is Master View.")

            NavigationLink(destination: DetailViewA() )
            { Text("Push to Detail View A.") }
        }
    }
}

struct ContentView: View {
    var body: some View {
        NavigationView {
            MasterView()
        }
    }
}
在导航链接上将视图修饰符设置为“取消详细信息链接”为 false 是使“从”弹出到根目录“正常工作的关键。是删除链接在默认情况下为 true,并且适用于包含的视图。例如,在 iPad 横向上,“拆分”视图是分开的,而“删除链接”可确保目标视图显示在右侧。将“取消详细信息链接”设置为 false 意味着目标视图将始终推送到导航堆栈上;因此总是可以弹出。
除了在< code>NavigationLink上将< code>isDetailLink设置为< code>false之外,还要将< code>isActive绑定传递给每个后续的目标视图。最后,当您想要弹出到根视图时,将值设置为< code>false,它将自动弹出所有内容:
import SwiftUI

struct ContentView: View {
    @State var isActive : Bool = false

    var body: some View {
        NavigationView {
            NavigationLink(
                destination: ContentView2(rootIsActive: self.$isActive),
                isActive: self.$isActive
            ) {
                Text("Hello, World!")
            }
            .isDetailLink(false)
            .navigationBarTitle("Root")
        }
    }
}

struct ContentView2: View {
    @Binding var rootIsActive : Bool

    var body: some View {
        NavigationLink(destination: ContentView3(shouldPopToRootView: self.$rootIsActive)) {
            Text("Hello, World #2!")
        }
        .isDetailLink(false)
        .navigationBarTitle("Two")
    }
}

struct ContentView3: View {
    @Binding var shouldPopToRootView : Bool

    var body: some View {
        VStack {
            Text("Hello, World #3!")
            Button (action: { self.shouldPopToRootView = false } ){
                Text("Pop to root")
            }
        }.navigationBarTitle("Three")
    }
}

struct ContentView_Previews: PreviewProvider {
    static var previews: some View {
        ContentView()
    }
}

当然,malhal拥有解决方案的关键,但是对我来说,将绑定作为参数传递给视图是不切实际的。正如Imthath所指出的,环境是一种更好的方式。
这是另一种仿照Apple发布的disiss()方法弹出到之前的View的方法。
定义环境的扩展:
struct RootPresentationModeKey: EnvironmentKey {
    static let defaultValue: Binding<RootPresentationMode> = .constant(RootPresentationMode())
}

extension EnvironmentValues {
    var rootPresentationMode: Binding<RootPresentationMode> {
        get { return self[RootPresentationModeKey.self] }
        set { self[RootPresentationModeKey.self] = newValue }
    }
}

typealias RootPresentationMode = Bool

extension RootPresentationMode {

    public mutating func dismiss() {
        self.toggle()
    }
}
用法:
>
将.environment(\.rootPresentationMode,self.$isPresented)添加到根导航视图中,其中
将. NavigationViewStyle(StackNavigationViewStyle())修饰符添加到根NavigationView,或将. isDetailLink(false)添加到第一个子视图的NavigationLink。
添加<代码> @环境(\。root presentation mode)private var root presentation mode 到任何子视图,从那里应该执行到根的pop。
最后,从子视图调用< code > self . root presentation mode . wrapped value . dissolve()将弹出到根视图。
我已经在GitHub上发布了一个完整的工作示例。
由于目前SwiftUI仍在后台使用UINavigationController,因此也可以调用其< code > popToRootViewController(animated:)函数。您只需在视图控制器层次结构中搜索UINavigationController,如下所示:
struct NavigationUtil {
  static func popToRootView() {
    findNavigationController(viewController: UIApplication.shared.windows.filter { $0.isKeyWindow }.first?.rootViewController)?
      .popToRootViewController(animated: true)
  }

  static func findNavigationController(viewController: UIViewController?) -> UINavigationController? {
    guard let viewController = viewController else {
      return nil
    }

    if let navigationController = viewController as? UINavigationController {
      return navigationController
    }

    for childViewController in viewController.children {
      return findNavigationController(viewController: childViewController)
    }

    return nil
  }
}
像这样使用它:
struct ContentView: View {
    var body: some View {
      NavigationView { DummyView(number: 1) }
    }
}

struct DummyView: View {
  let number: Int

  var body: some View {
    VStack(spacing: 10) {
      Text("This is view \(number)")
      NavigationLink(destination: DummyView(number: number + 1)) {
        Text("Go to view \(number + 1)")
      }
      Button(action: { NavigationUtil.popToRootView() }) {
        Text("Or go to root view!")
      }
    }
  }
}