
我想创建一个网格布局,使用一个网格填充第一行,直到它在窗口中用完空间,并将动态地将项目移动到下面的行(如文本换行)。随着窗宽的调整,栅格也会随之调整。不需要调整框的大小。我打算保持每个小盒子的大小,但改变布局放置每个盒子的位置。
我认为通过测量帧的宽度可以实现此功能,如果(框数)*(每个框的宽度)超过宽度,则移动到下一行。我只是想知道是否有一个更好的方法,我不明白。
如果以上是唯一的选项,那么更新该选项的最佳方式是什么?我是否必须在调整窗口大小或其他方面设置事件?看起来我不应该重做布局管理器,这就是我的感觉。我只想检查一下是否已经内置了类似的功能。网格似乎是一个强大的布局管理器,但我还没有找到这个选项。
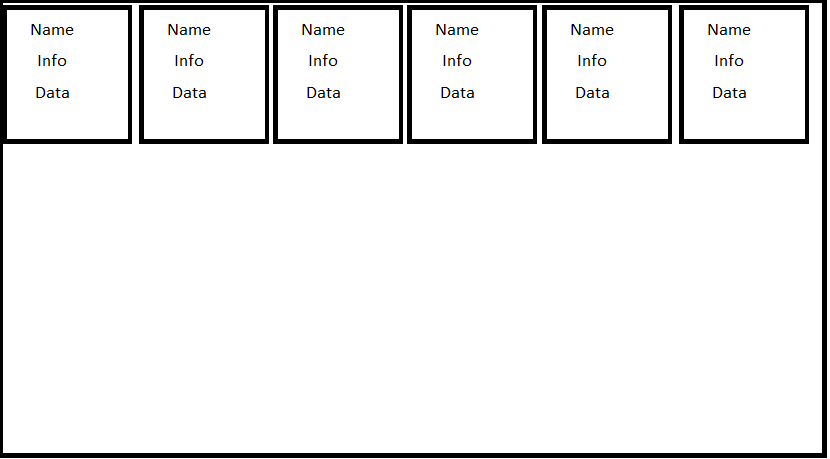
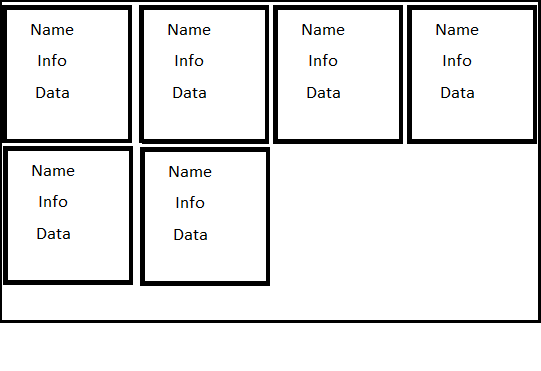
下面的图片描述了我想要使用网格布局在单个框架上使用相同的6个框集的行为。
如果您计划强制每个框大小一致,最简单的解决方案是使用文本小部件作为容器,因为它具有内置的换行能力。
下面是一个工作示例。单击“添加”按钮添加其他框。调整窗口大小,以查看它们在窗口增大和缩小时自动换行。
import Tkinter as tk
import random

class DynamicGrid(tk.Frame):
    def __init__(self, parent, *args, **kwargs):
        tk.Frame.__init__(self, parent, *args, **kwargs)
        self.text = tk.Text(self, wrap="char", borderwidth=0, highlightthickness=0,
                            state="disabled")
        self.text.pack(fill="both", expand=True)
        self.boxes = []

    def add_box(self, color=None):
        bg = color if color else random.choice(("red", "orange", "green", "blue", "violet"))
        box = tk.Frame(self.text, bd=1, relief="sunken", background=bg,
                       width=100, height=100)
        self.boxes.append(box)
        self.text.configure(state="normal")
        self.text.window_create("end", window=box)
        self.text.configure(state="disabled")

class Example(object):
    def __init__(self):
        self.root = tk.Tk()
        self.dg = DynamicGrid(self.root, width=500, height=200)
        add_button  = tk.Button(self.root, text="Add", command=self.dg.add_box)

        add_button.pack()
        self.dg.pack(side="top", fill="both", expand=True)

        # add a few boxes to start
        for i in range(10):
            self.dg.add_box()

    def start(self):
        self.root.mainloop()

Example().start()
这里有一个工作示例:
import Tkinter as tk

class AutoGrid(tk.Frame):
    def __init__(self, master=None, **kwargs):
        tk.Frame.__init__(self, master, **kwargs)
        self.columns = None
        self.bind('<Configure>', self.regrid)

    def regrid(self, event=None):
        width = self.winfo_width()
        slaves = self.grid_slaves()
        max_width = max(slave.winfo_width() for slave in slaves)
        cols = width // max_width
        if cols == self.columns: # if the column number has not changed, abort
            return
        for i, slave in enumerate(slaves):
            slave.grid_forget()
            slave.grid(row=i//cols, column=i%cols)
        self.columns = cols

class TestFrame(tk.Frame):
    def __init__(self, master=None, **kwargs):
        tk.Frame.__init__(self, master, bd=5, relief=tk.RAISED, **kwargs)

        tk.Label(self, text="name").pack(pady=10)
        tk.Label(self, text=" info ........ info ").pack(pady=10)
        tk.Label(self, text="data\n"*5).pack(pady=10)

def main():
    root = tk.Tk()
    frame = AutoGrid(root)
    frame.pack(fill=tk.BOTH, expand=True)

    TestFrame(frame).grid() # use normal grid parameters to set up initial layout
    TestFrame(frame).grid(column=1)
    TestFrame(frame).grid(column=2)
    TestFrame(frame).grid()
    TestFrame(frame).grid()
    TestFrame(frame).grid()
    root.mainloop()

if __name__ == '__main__':
    main()
注意,这将破坏网格管理器的rowspan和columnspan功能。
这里是Bryan答案的简化版本,没有课,还有一些额外的注释,供那些感到困惑并试图在自己的项目中快速实现这一点的人参考。
from tkinter import *
import tkinter as tk

#Create main window
root = tk.Tk()

#Create WidgetWrapper
widgetWrapper = tk.Text(root, wrap="char", borderwidth=0,highlightthickness=0,state="disabled", cursor="arrow")
#state = "disabled" is to disable text from being input by user
#cursor = "arrow" is to ensure when user hovers, the "I" beam cursor (text cursor) is not displayed

widgetWrapper.pack(fill="both", expand=True)

def additem():
    item = Label(bd = 5, relief="solid", text="O", bg="red") #Create the actual widgets
    widgetWrapper.window_create("end", window=item) #Put it inside the widget wrapper (the text)

# add a few boxes to start
for i in range(10):
    additem()

#Not needed to implement in other code, just an add button
add_button  = tk.Button(root, text="Add", command=additem)
add_button.pack()
