android LabelView实现标签云效果
今天我们来做一个android上的标签云效果, 虽然还不是很完美,但是已经足够可以展现标签云的效果了,首先来看看效果吧。
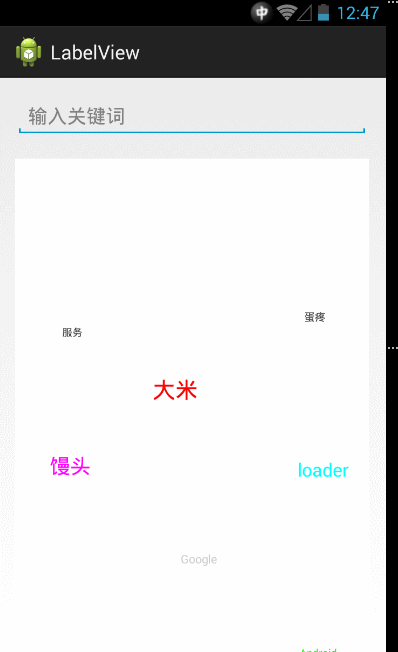
额,录屏只能录到这个份上了,凑活着看吧。今天我们就来实现一下这个效果, 这次我选择直接继承view来, 什么? 这样的效果不是SurfaceView擅长的吗? 为什么要view,其实都可以了, 我选择view,是因为:额,我对SurfaceView还不是很熟悉。
废话少说, 下面开始上代码
public class LabelView extends View {
 private static final int DIRECTION_LEFT = 0; // 向左
 private static final int DIRECTION_RIGHT = 1; // 向右
 private static final int DIRECITON_TOP = 2; // 向上
 private static final int DIRECTION_BOTTOM = 3; // 向下

 private boolean isStatic; // 是否静止, 默认false, 可用干xml : label:is_static="false"

 private int[][] mLocations; // 每个label的位置 x/y
 private int[][] mDirections; // 每个label的方向 x/y
 private int[][] mSpeeds; // 每个label的x/y速度 x/y
 private int[][] mTextWidthAndHeight; // 每个labeltext的大小 width/height

 private String[] mLabels; // 设置的labels
 private int[] mFontSizes; // 每个label的字体大小
 // 默认配色方案
 private int[] mColorSchema = {0XFFFF0000, 0XFF00FF00, 0XFF0000FF, 0XFFCCCCCC, 0XFFFFFFFF};

 private int mTouchSlop; // 最小touch
 private int mDownX = -1;
 private int mDownY = -1;
 private int mDownIndex = -1; // 点击的index

 private Paint mPaint;

 private Thread mThread;

 private OnItemClickListener mListener; // item点击事件

 public LabelView(Context context, AttributeSet attrs) {
  this(context, attrs, 0);
 }

 public LabelView(Context context, AttributeSet attrs, int defStyleAttr) {
  super(context, attrs, defStyleAttr);

  TypedArray ta = context.obtainStyledAttributes(attrs, R.styleable.LabelView, defStyleAttr, 0);
  isStatic = ta.getBoolean(R.styleable.LabelView_is_static, false);
  ta.recycle();

  mTouchSlop = ViewConfiguration.get(context).getScaledTouchSlop();

  mPaint = new Paint();
  mPaint.setAntiAlias(true);
 }

 @Override
 protected void onLayout(boolean changed, int left, int top, int right,
   int bottom) {
  super.onLayout(changed, left, top, right, bottom);
  init();
 }

 @Override
 protected void onDraw(Canvas canvas) {
  if(!hasContents()) {
   return;
  }

  for (int i = 0; i < mLabels.length; i++) {
   mPaint.setTextSize(mFontSizes[i]);

   if(i < mColorSchema.length) mPaint.setColor(mColorSchema[i]);
   else mPaint.setColor(mColorSchema[i-mColorSchema.length]);

   canvas.drawText(mLabels[i], mLocations[i][0], mLocations[i][1], mPaint);
  }
 }

 @Override
 public boolean onTouchEvent(MotionEvent ev) {
  switch (ev.getAction()) {
  case MotionEvent.ACTION_DOWN:
   mDownX = (int) ev.getX();
   mDownY = (int) ev.getY();
   mDownIndex = getClickIndex();
   break;
  case MotionEvent.ACTION_UP:
   int nowX = (int) ev.getX();
   int nowY = (int) ev.getY();
   if (nowX - mDownX < mTouchSlop && nowY - mDownY < mTouchSlop
     && mDownIndex != -1 && mListener != null) {
    mListener.onItemClick(mDownIndex, mLabels[mDownIndex]);
   }

   mDownX = mDownY = mDownIndex = -1;
   break;
  }

  return true;
 }

 /**
  * 获取当前点击的label的位置
  * @return label的位置,没有点中返回-1
  */
 private int getClickIndex() {
  Rect downRect = new Rect();
  Rect locationRect = new Rect();
  for(int i=0;i<mLocations.length;i++) {
   downRect.set(mDownX - mTextWidthAndHeight[i][0], mDownY
     - mTextWidthAndHeight[i][1], mDownX
     + mTextWidthAndHeight[i][0], mDownY
     + mTextWidthAndHeight[i][1]);

   locationRect.set(mLocations[i][0], mLocations[i][1],
     mLocations[i][0] + mTextWidthAndHeight[i][0],
     mLocations[i][1] + mTextWidthAndHeight[i][1]);

   if(locationRect.intersect(downRect)) {
    return i;
   }
  }
  return -1;
 }

 /**
  * 开启子线程不断刷新位置并postInvalidate
  */
 private void run() {
  if(mThread != null && mThread.isAlive()) {
   return;
  }

  mThread = new Thread(mStartRunning);
  mThread.start();
 }

 private Runnable mStartRunning = new Runnable() {
  @Override
  public void run() {
   for(;;) {
    SystemClock.sleep(100);

    for (int i = 0; i < mLabels.length; i++) {
     if (mLocations[i][0] <= getPaddingLeft()) {
      mDirections[i][0] = DIRECTION_RIGHT;
     }

     if (mLocations[i][0] >= getMeasuredWidth()
       - getPaddingRight() - mTextWidthAndHeight[i][0]) {
      mDirections[i][0] = DIRECTION_LEFT;
     }

     if(mLocations[i][1] <= getPaddingTop() + mTextWidthAndHeight[i][1]) {
      mDirections[i][1] = DIRECTION_BOTTOM;
     }

     if (mLocations[i][1] >= getMeasuredHeight() - getPaddingBottom()) {
      mDirections[i][1] = DIRECITON_TOP;
     }

     int xSpeed = 1;
     int ySpeed = 2;

     if(i < mSpeeds.length) {
      xSpeed = mSpeeds[i][0];
      ySpeed = mSpeeds[i][1];
     }
     else {
      xSpeed = mSpeeds[i-mSpeeds.length][0];
      ySpeed = mSpeeds[i-mSpeeds.length][1];
     }

     mLocations[i][0] += mDirections[i][0] == DIRECTION_RIGHT ? xSpeed : -xSpeed;
     mLocations[i][1] += mDirections[i][1] == DIRECTION_BOTTOM ? ySpeed : -ySpeed;
    }

    postInvalidate();
   }
  }
 };

 /**
  * 初始化位置、方向、label宽高
  * 并开启线程
  */
 private void init() {
  if(!hasContents()) {
   return;
  }

  int minX = getPaddingLeft();
  int minY = getPaddingTop();
  int maxX = getMeasuredWidth() - getPaddingRight();
  int maxY = getMeasuredHeight() - getPaddingBottom();

  Rect textBounds = new Rect();

  for (int i = 0; i < mLabels.length; i++) {
   int[] location = new int[2];
   location[0] = minX + (int) (Math.random() * maxX);
   location[1] = minY + (int) (Math.random() * maxY);

   mLocations[i] = location;
   mFontSizes[i] = 15 + (int) (Math.random() * 30);
   mDirections[i][0] = Math.random() > 0.5 ? DIRECTION_RIGHT : DIRECTION_LEFT;
   mDirections[i][1] = Math.random() > 0.5 ? DIRECTION_BOTTOM : DIRECITON_TOP;

   mPaint.setTextSize(mFontSizes[i]);
   mPaint.getTextBounds(mLabels[i], 0, mLabels[i].length(), textBounds);
   mTextWidthAndHeight[i][0] = textBounds.width();
   mTextWidthAndHeight[i][1] = textBounds.height();
  }

  if(!isStatic) run();
 }

 /**
  * 是否设置label
  * @return true or false
  */
 private boolean hasContents() {
  return mLabels != null && mLabels.length > 0;
 }

 /**
  * 设置labels
  * @see setLabels(String[] labels)
  * @param labels
  */
 public void setLabels(List<String> labels) {
  setLabels((String[]) labels.toArray());
 }

 /**
  * 设置labels
  * @param labels
  */
 public void setLabels(String[] labels) {
  mLabels = labels;
  mLocations = new int[labels.length][2];
  mFontSizes = new int[labels.length];
  mDirections = new int[labels.length][2];
  mTextWidthAndHeight = new int[labels.length][2];

  mSpeeds = new int[labels.length][2];
  for(int speed[] : mSpeeds) {
   speed[0] = speed[1] = 1;
  }

  requestLayout();
 }

 /**
  * 设置配色方案
  * @param colorSchema
  */
 public void setColorSchema(int[] colorSchema) {
  mColorSchema = colorSchema;
 }

 /**
  * 设置每个item的x/y速度
  * <p>
  * speeds.length > labels.length 忽略多余的
  * <p>
  * speeds.length < labels.length 将重复使用
  *
  * @param speeds
  */
 public void setSpeeds(int[][] speeds) {
  mSpeeds = speeds;
 }

 /**
  * 设置item点击的监听事件
  * @param l
  */
 public void setOnItemClickListener(OnItemClickListener l) {
  getParent().requestDisallowInterceptTouchEvent(true);
  mListener = l;
 }

 /**
  * item的点击监听事件
  */
 public interface OnItemClickListener {
  public void onItemClick(int index, String label);
 }
}
上来先弄了4个常量上去,干嘛用的呢? 是要判断每个item的方向的,因为当达到某个边界的时候,item要向相反的方向移动。
第二个构造方法中, 获取了一个自定义属性,还有就是初始化的Paint。
继续看onLayout, 其实onLayout我们什么都没干,只是调用了init方法, 来看看init方法。
/**
 * 初始化位置、方向、label宽高
 * 并开启线程
 */
private void init() {
 if(!hasContents()) {
  return;
 }

 int minX = getPaddingLeft();
 int minY = getPaddingTop();
 int maxX = getMeasuredWidth() - getPaddingRight();
 int maxY = getMeasuredHeight() - getPaddingBottom();

 Rect textBounds = new Rect();

 for (int i = 0; i < mLabels.length; i++) {
  int[] location = new int[2];
  location[0] = minX + (int) (Math.random() * maxX);
  location[1] = minY + (int) (Math.random() * maxY);

  mLocations[i] = location;
  mFontSizes[i] = 15 + (int) (Math.random() * 30);
  mDirections[i][0] = Math.random() > 0.5 ? DIRECTION_RIGHT : DIRECTION_LEFT;
  mDirections[i][1] = Math.random() > 0.5 ? DIRECTION_BOTTOM : DIRECITON_TOP;

  mPaint.setTextSize(mFontSizes[i]);
  mPaint.getTextBounds(mLabels[i], 0, mLabels[i].length(), textBounds);
  mTextWidthAndHeight[i][0] = textBounds.width();
  mTextWidthAndHeight[i][1] = textBounds.height();
 }

 if(!isStatic) run();
}
init方法中,上来先判断一下,是否设置了标签,如果没有设置直接返回,省得事多。
10~13行,目的就是获取item在该view中移动的上下左右边界,毕竟item还是要在整个view中移动的嘛,不能超出了view的边界。
17行,开始一个for循环,去遍历所有的标签。
18~20行,是随机初始化一个位置,所以,我们的标签每次出现的位置都是随机的,并没有什么规律,但接下来的移动是有规律的,总不能到处乱蹦吧。
接着,22行,保存了这个位置,因为我们下面要不断的去修改这个位置。
23行,随机了一个字体大小,24、25行,随机了该标签x/y初始的方向。
27行,去设置了当前标签的字体大小,28行,是获取标签的宽度和高度,并在下面保存在了一个二维数组中,为什么是二维数组,我们有多个标签嘛, 每个标签都要保存它的宽度和高度。
最后,如果我们没有显示的声明labelview是静止的,则去调用run方法。
继续跟进代码,看看run方法的内脏。
/**
 * 开启子线程不断刷新位置并postInvalidate
 */
private void run() {
 if(mThread != null && mThread.isAlive()) {
  return;
 }

 mThread = new Thread(mStartRunning);
 mThread.start();
}
5~7行,如果线程已经开启,直接return 防止多个线程共存,这样造成的后果就是标签越来越快。
9、10行,去启动一个线程,并有一个mStartRunning的Runnable参数。
那么我们继续来看看这个Runnable。
private Runnable mStartRunning = new Runnable() {
 @Override
 public void run() {
  for(;;) {
   SystemClock.sleep(100);

   for (int i = 0; i < mLabels.length; i++) {
    if (mLocations[i][0] <= getPaddingLeft()) {
     mDirections[i][0] = DIRECTION_RIGHT;
    }

    if (mLocations[i][0] >= getMeasuredWidth()
      - getPaddingRight() - mTextWidthAndHeight[i][0]) {
     mDirections[i][0] = DIRECTION_LEFT;
    }

    if(mLocations[i][1] <= getPaddingTop() + mTextWidthAndHeight[i][1]) {
     mDirections[i][1] = DIRECTION_BOTTOM;
    }

    if (mLocations[i][1] >= getMeasuredHeight() - getPaddingBottom()) {
     mDirections[i][1] = DIRECITON_TOP;
    }

    int xSpeed = 1;
    int ySpeed = 2;

    if(i < mSpeeds.length) {
     xSpeed = mSpeeds[i][0];
     ySpeed = mSpeeds[i][1];
    }else {
     xSpeed = mSpeeds[i-mSpeeds.length][0];
     ySpeed = mSpeeds[i-mSpeeds.length][1];
    }

    mLocations[i][0] += mDirections[i][0] == DIRECTION_RIGHT ? xSpeed : -xSpeed;
    mLocations[i][1] += mDirections[i][1] == DIRECTION_BOTTOM ? ySpeed : -ySpeed;
   }

   postInvalidate();
  }
 }
};
这个Runnable其实才是标签云实现的关键,我们就是在这个线程中去修改每个标签的位置,并通知view去重绘的。
而且可以看到,在run中是一个死循环,这样我们的标签才能无休止的移动,接下来就是让线程去休息100ms,总不能一个劲的去移动吧,速度太快了也不好,也要考虑性能问题。
接下来第7行,去遍历所有的标签,8~23行,通过判断当前的位置是不是达到了某个边界,如果到了,则修改方向为相反的方向,例如现在到了view的最上面,那接下来,这个标签就得往下移动了。
25、26行,默认了x/y的速度,为什么是说默认了呢, 因为每个标签的x/y速度我们都可以通过方法去设置。
接下来28~34行,做了一个判断,大体意思就是:如果设置的那些速度总数大于当前标签在标签s中的位置,则去找对应位置的速度,否则,重新从前面获取速度。
36、37行就是根据x/y上的方向去修改当前标签的坐标了。
最后,调用了postInvalidate(),通知view去刷新界面,这里是用的postInvalidate()因为我们是在线程中调用的,切记。
postInvalidate()后,肯定就要走onDraw()去绘制这些标签了,那么我们就来看看onDraw吧。
@Override
protected void onDraw(Canvas canvas) {
 if(!hasContents()) {
  return;
 }

 for (int i = 0; i < mLabels.length; i++) {
  mPaint.setTextSize(mFontSizes[i]);

  if(i < mColorSchema.length) mPaint.setColor(mColorSchema[i]);
  else mPaint.setColor(mColorSchema[i-mColorSchema.length]);

  canvas.drawText(mLabels[i], mLocations[i][0], mLocations[i][1], mPaint);
 }
}
上来还是判断了一下,如果没有设置标签,直接返回。 如果有标签,那么去遍历所有标签,并设置对应的字体大小,还记得吗? 我们在初始化的时候随机了每个标签的字体大小,接下来去设置该标签的颜色,一个if else 原理和设置速度那个是一样的,最关键的就是下面,调用了canvas.drawText()将该标签画到屏幕上,mLocations中我们是保存了每个标签的位置,而且是在线程中不断的去修改这个位置的。
到这里,其实我们的LabelView就能动起来了,不过那几个设置标签,速度,颜色的方法还有说。其实很简单,来看一下吧。
/**
 * 设置labels
 * @see setLabels(String[] labels)
 * @param labels
 */
public void setLabels(List<String> labels) {
 setLabels((String[]) labels.toArray());
}

/**
 * 设置labels
 * @param labels
 */
public void setLabels(String[] labels) {
 mLabels = labels;
 mLocations = new int[labels.length][2];
 mFontSizes = new int[labels.length];
 mDirections = new int[labels.length][2];
 mTextWidthAndHeight = new int[labels.length][2];

 mSpeeds = new int[labels.length][2];
 for(int speed[] : mSpeeds) {
  speed[0] = speed[1] = 1;
 }

 requestLayout();
}

/**
 * 设置配色方案
 * @param colorSchema
 */
public void setColorSchema(int[] colorSchema) {
 mColorSchema = colorSchema;
}

/**
 * 设置每个item的x/y速度
 * <p>
 * speeds.length > labels.length 忽略多余的
 * <p>
 * speeds.length < labels.length 将重复使用
 *
 * @param speeds
 */
public void setSpeeds(int[][] speeds) {
 mSpeeds = speeds;
}
这几个蛋疼的方法中,唯一可说的就是setLabels(String[] labels)了,因为在这个方法中还做了点工作。 仔细观察,这方法除了设置了标签s外,其他的就是初始化了几个数组,都表示什么,相信都应该很清楚了,还有就是在这里我们初始化了默认速度为1。
刚上来做演示的时候,LabelView还能item点击,这是怎么做到的呢? 普通的onClick肯定是不行的,因为我们并不知道点击的x/y坐标,所以只能通过onTouchEvent入手了。
@Override
public boolean onTouchEvent(MotionEvent ev) {
 switch (ev.getAction()) {
 case MotionEvent.ACTION_DOWN:
  mDownX = (int) ev.getX();
  mDownY = (int) ev.getY();
  mDownIndex = getClickIndex();
  break;
 case MotionEvent.ACTION_UP:
  int nowX = (int) ev.getX();
  int nowY = (int) ev.getY();
  if (nowX - mDownX < mTouchSlop && nowY - mDownY < mTouchSlop
    && mDownIndex != -1 && mListener != null) {
   mListener.onItemClick(mDownIndex, mLabels[mDownIndex]);
  }

  mDownX = mDownY = mDownIndex = -1;
  break;
 }

 return true;
}
在onTouch中我们只关心了down和up事件,因为一次点击就是down和up的组合嘛。
在down中,我们获取了当前事件发生的x/y坐标,并且获取了当前点击的item,当前是通过getClickIndex()方法去获取的,这个方法稍候说;再来看看up,在up中,我们通过当前的x/y和在down时的x/y对比,如果这两点的距离小于系统认为的最小滑动距离,才能说明点击有效,如果你down了以后,拉了一个长线,再up,那肯定不是一次有效的点击,当然点击有效了还不能说明一切,只有命中标签了才行,所以还去判断了mDownIndex是否为一个有效的值,然后如果设置了ItemClick,就去回调它。
那mDownIndex到底是怎么获取的呢? 我们来getClickIndex()一探究竟。
/**
 * 获取当前点击的label的位置
 * @return label的位置,没有点中返回-1
 */
private int getClickIndex() {
 Rect downRect = new Rect();
 Rect locationRect = new Rect();
 for(int i=0;i<mLocations.length;i++) {
  downRect.set(mDownX - mTextWidthAndHeight[i][0], mDownY
    - mTextWidthAndHeight[i][1], mDownX
    + mTextWidthAndHeight[i][0], mDownY
    + mTextWidthAndHeight[i][1]);

  locationRect.set(mLocations[i][0], mLocations[i][1],
    mLocations[i][0] + mTextWidthAndHeight[i][0],
    mLocations[i][1] + mTextWidthAndHeight[i][1]);

  if(locationRect.intersect(downRect)) {
   return i;
  }
 }
 return -1;
}
首先定义了两个Rect,一个是点击的rect,另一个是标签的rect,然后去遍历保存的最新的每个标签的位置,在循环中,我们通过Rect.set()方法分别设置了down的矩形的上下左右和当前标签的上下左右,然后通过Rect.intersect()方法去判断这两个矩形是否有交集,有交集就证明点击到了该标签,直接返回该标签在标签s中的位置,如果都没有返回-1表示你丫乱点!
好了,到这里,整个LabelView就弄好了,赶紧去下载源码体验一把吧,当然还不算很完美,完美的解决方案等用到它的时候再去解决,嘿嘿,反正我们已经有一个思路了。
哦,对了,还没给出源码的下载地址,看这里
以上就是本文的全部内容,希望对大家的学习有所帮助,也希望大家多多支持呐喊教程。
声明:本文内容来源于网络,版权归原作者所有,内容由互联网用户自发贡献自行上传,本网站不拥有所有权,未作人工编辑处理,也不承担相关法律责任。如果您发现有涉嫌版权的内容,欢迎发送邮件至:notice#yiidian.com(发邮件时,请将#更换为@)进行举报,并提供相关证据,一经查实,本站将立刻删除涉嫌侵权内容。
