Android RecyclerView实现下拉刷新和上拉加载
RecyclerView已经出来很久了,许许多多的项目都开始从ListView转战RecyclerView,那么,上拉加载和下拉刷新是一件很有必要的事情。
在ListView上,我们可以通过自己添加addHeadView和addFootView去添加头布局和底部局实现自定义的上拉和下拉,或者使用一些第三方库来简单的集成,例如Android-pulltorefresh或者android-Ultra-Pull-to-Refresh,后者的自定义更强,但需要自己实现上拉加载。
而在下面我们将用两种方式来实现上拉加载和下拉刷新
第一种方式:SwipeRefreshLayout+滑动底部自动加载
第二种方式:使用第三方库SwipeToLoadLayout实现上拉加载和下拉刷新。
第一种方式:SwipeRefreshLayout+滑动底部自动加载
SwipeRefreshLayout实现很简单,重点是滑动到底部自动加载应该如何实现,其实其实现的方式类似于ListView的实现方式。
看一下activity_recycle_swiperefresh.xml文件:
<android.support.v4.widget.SwipeRefreshLayout xmlns:android="http://schemas.android.com/apk/res/android"
 android:id="@+id/swipe_refresh"
 android:orientation="vertical" android:layout_width="match_parent"
 android:layout_height="match_parent">

 <android.support.v7.widget.RecyclerView
  android:id="@+id/swipe_target"
  android:layout_width="match_parent"
  android:layout_height="wrap_content"
  android:scrollbars="none" />

</android.support.v4.widget.SwipeRefreshLayout>
布局文件就两个控件,SwipeRefreshLayout中嵌套RecyclerView。
在代码中初始化RecyclerView以及实现adapter等,这不是重点,不再贴代码。
在RecyclerView中有方法addOnScrollListener,该方法类似于ListView的setOnScrollListener方法,OnScrollListener中有两个方法的回调
*onScrolled(RecyclerView recyclerView, int dx, int dy) :滚动的回调,dx和dy表示手指滑动水平和垂直的偏移量。
*onScrollStateChanged(RecyclerView recyclerView, int newState):滑动状态的回调。
那么,我们的着重点就在这个两个方法上了。
对于向上加载更多,我们需要有如下判断
--是否是向上滑动
--是否滑动到底部
--当前是否正在加载数据
--当前状态是否是滑动停止的状态
实现比较复杂,定义一个类LoadDataScrollController,继承类RecyclerView.OnScrollListener,
因为onScrollStateChanged实在状态改变时的回调,无法时时的获取显示的条目以及位置,所以我们在onScrolled中获取相应位置,
 @Override
 public void onScrolled(RecyclerView recyclerView, int dx, int dy) {

  /**
   * 获取布局参数
   */
  RecyclerView.LayoutManager layoutManager = recyclerView.getLayoutManager();

  //如果为null,第一次运行,确定布局类型
  if (mLayoutManagerType == null) {
   if (layoutManager instanceof LinearLayoutManager) {
    mLayoutManagerType = LayoutManagerType.LINEAR_LAYOUT;
   } else if (layoutManager instanceof GridLayoutManager) {
    mLayoutManagerType = LayoutManagerType.GRID_LAYOUT;
   } else if (layoutManager instanceof StaggeredGridLayoutManager) {
    mLayoutManagerType = LayoutManagerType.STAGGERED_GRID_LAYOUT;
   } else {
    throw new RuntimeException("LayoutManager should be LinearLayoutManager,GridLayoutManager,StaggeredGridLayoutManager");
   }
  }

  //对于不太能够的布局参数,不同的方法获取到当前显示的最后一个条目数
  switch (mLayoutManagerType) {
   case LINEAR_LAYOUT:
    mLastVisibleItemPosition = ((LinearLayoutManager) layoutManager).findLastVisibleItemPosition();
    break;
   case GRID_LAYOUT:
    mLastVisibleItemPosition = ((GridLayoutManager) layoutManager).findLastVisibleItemPosition();
    break;
   case STAGGERED_GRID_LAYOUT:
    StaggeredGridLayoutManager staggeredGridLayoutManager = (StaggeredGridLayoutManager) layoutManager;
    if (mLastPostions == null) {
     mLastPostions = new int[staggeredGridLayoutManager.getSpanCount()];
    }
    staggeredGridLayoutManager.findLastVisibleItemPositions(mLastPostions);
    mLastVisibleItemPosition = findMax(mLastPostions);
    break;
   default:
    break;
  }

 }
首先获取布局管理器,并判断是那种类型的,因为有三种类型,定义枚举来保存布局类型的参数
/**
 *
 * RecycleView的布局管理器的类型
 * Created by Alex_MaHao on 2016/5/10.
 */
public enum LayoutManagerType {
 LINEAR_LAYOUT,
 GRID_LAYOUT,
 STAGGERED_GRID_LAYOUT
}
然后根据布局惯例其的类型获取其当前显示的最大条目,对于瀑布流来说,他如果是垂直的两列瀑布的话,我们需要获取两列中分别最大条目数,进行比较,选出最大条目数。
 /**
  * 当是瀑布流时,获取到的是每一个瀑布最下方显示的条目,通过条目进行对比
  */
 private int findMax(int[] lastPositions) {
  int max = lastPositions[0];
  for (int value : lastPositions) {
   if (value > max) {
    max = value;
   }
  }
  return max;
 }
拿到当前最大的条目数之后,在onScrollStateChange中进行判断状态等,
 @Override
 public void onScrollStateChanged(RecyclerView recyclerView, int newState) {

  RecyclerView.LayoutManager layoutManager = recyclerView.getLayoutManager();

  //RecycleView 显示的条目数
  int visibleCount = layoutManager.getChildCount();

  //显示数据总数
  int totalCount = layoutManager.getItemCount();


  // 四个条件,分别是是否有数据,状态是否是滑动停止状态,显示的最大条目是否大于整个数据(注意偏移量),是否正在加载数据
  if(visibleCount>0
    &&newState==RecyclerView.SCROLL_STATE_IDLE
    &&mLastVisibleItemPosition>=totalCount-1
    &&!isLoadData){
   //可以加载数据
   isLoadData = true;
  }

 }
注释很清楚,在加载数据的地方,我们将isLoadData设为true,同时利用接口回调加载数据,等数据加载完成,通过setLoadDataStatus方法设置为false
 public void setLoadDataStatus(boolean isLoadData){
  this.isLoadData = isLoadData;
 }
如果这样就结束了,感觉很麻烦,对于刷新和加载更多,我们需要在调用的地方分别设置监听,那么我们可以让LoadDataScrollController实现SwipeRefreshLayout的刷新监听方法,在利用我们定义的统一的上拉刷新和加载数据接口进行处理
/**
 * 实现上拉加载的监听:加载条件:滑动到最后,且是停止状态,则开始加载数据
 * Created by Alex_MaHao on 2016/5/10.
 */
public class LoadDataScrollController extends RecyclerView.OnScrollListener implements SwipeRefreshLayout.OnRefreshListener {

 /**
  * 当前布局管理器的类型
  */
 private LayoutManagerType mLayoutManagerType;


 /**
  * 当前RecycleView显示的最大条目
  */
 private int mLastVisibleItemPosition;


 /**
  * 每列的最后一个条目
  */
 private int[] mLastPostions;


 /**
  * 是否正在加载数据 包括刷新和向上加载更多
  */
 private boolean isLoadData = false;


 /**
  * 回调接口
  */
 private OnRecycleRefreshListener mListener;


 public LoadDataScrollController(OnRecycleRefreshListener onRecycleRefreshListener) {
  this.mListener = onRecycleRefreshListener;
 }

 @Override
 public void onScrolled(RecyclerView recyclerView, int dx, int dy) {

  /**
   * 获取布局参数
   */
  RecyclerView.LayoutManager layoutManager = recyclerView.getLayoutManager();

  //如果为null,第一次运行,确定布局类型
  if (mLayoutManagerType == null) {
   if (layoutManager instanceof LinearLayoutManager) {
    mLayoutManagerType = LayoutManagerType.LINEAR_LAYOUT;
   } else if (layoutManager instanceof GridLayoutManager) {
    mLayoutManagerType = LayoutManagerType.GRID_LAYOUT;
   } else if (layoutManager instanceof StaggeredGridLayoutManager) {
    mLayoutManagerType = LayoutManagerType.STAGGERED_GRID_LAYOUT;
   } else {
    throw new RuntimeException("LayoutManager should be LinearLayoutManager,GridLayoutManager,StaggeredGridLayoutManager");
   }
  }

  //对于不太能够的布局参数,不同的方法获取到当前显示的最后一个条目数
  switch (mLayoutManagerType) {
   case LINEAR_LAYOUT:
    mLastVisibleItemPosition = ((LinearLayoutManager) layoutManager).findLastVisibleItemPosition();
    break;
   case GRID_LAYOUT:
    mLastVisibleItemPosition = ((GridLayoutManager) layoutManager).findLastVisibleItemPosition();
    break;
   case STAGGERED_GRID_LAYOUT:
    StaggeredGridLayoutManager staggeredGridLayoutManager = (StaggeredGridLayoutManager) layoutManager;
    if (mLastPostions == null) {
     mLastPostions = new int[staggeredGridLayoutManager.getSpanCount()];
    }
    staggeredGridLayoutManager.findLastVisibleItemPositions(mLastPostions);
    mLastVisibleItemPosition = findMax(mLastPostions);
    break;
   default:
    break;
  }

 }

 @Override
 public void onScrollStateChanged(RecyclerView recyclerView, int newState) {

  RecyclerView.LayoutManager layoutManager = recyclerView.getLayoutManager();

  //RecycleView 显示的条目数
  int visibleCount = layoutManager.getChildCount();

  //显示数据总数
  int totalCount = layoutManager.getItemCount();


  // 四个条件,分别是是否有数据,状态是否是滑动停止状态,显示的最大条目是否大于整个数据(注意偏移量),是否正在加载数据
  if(visibleCount>0
    &&newState==RecyclerView.SCROLL_STATE_IDLE
    &&mLastVisibleItemPosition>=totalCount-1
    &&!isLoadData){
   //可以加载数据
   if(mListener!=null){
    isLoadData = true;
    mListener.loadMore();
   }
  }

 }


 /**
  * 当是瀑布流时,获取到的是每一个瀑布最下方显示的条目,通过条目进行对比
  */
 private int findMax(int[] lastPositions) {
  int max = lastPositions[0];
  for (int value : lastPositions) {
   if (value > max) {
    max = value;
   }
  }
  return max;
 }


 public void setLoadDataStatus(boolean isLoadData){
  this.isLoadData = isLoadData;
 }

 @Override
 public void onRefresh() {
  //刷新数据的方法
  if(mListener!=null){
   isLoadData = true;
   mListener.refresh();
  }

 }

 /**
  * 数据加载接口回调
  */
 interface OnRecycleRefreshListener{
  void refresh();
  void loadMore();
 }
}
最后看一下main的代码
/**
 * 使用原生的SwipeRefreshLayout和代码判断
 *  实现RecyclewView 的刷新和加载更多
 *
 * Created by Alex_MaHao on 2016/5/10.
 */
public class SwipeRefreshActivity extends AppCompatActivity implements LoadDataScrollController.OnRecycleRefreshListener {


 private SwipeRefreshLayout mSwipeRefresh;

 private RecyclerView mRecycle;

 private HomeAdapter mAdapter;

 private LoadDataScrollController mController;


 private ProgressDialog pd;

 @Override
 protected void onCreate(@Nullable Bundle savedInstanceState) {
  super.onCreate(savedInstanceState);

  setContentView(R.layout.activity_recycle_swiperefresh);

  mRecycle = ((RecyclerView) findViewById(R.id.swipe_target));

  mSwipeRefresh = ((SwipeRefreshLayout) findViewById(R.id.swipe_refresh));

  mSwipeRefresh.setColorSchemeColors(Color.RED,Color.GREEN,Color.BLUE);

  /**
   * 创建控制器,同时使当前activity实现数据监听回调接口
   */
  mController = new LoadDataScrollController(this);


  mAdapter = new HomeAdapter();

  //设置垂直的线性布局管理器,Orientation --> VERTICAL:垂直 HORIZONTAL:水平
  LinearLayoutManager layoutManager = new LinearLayoutManager(this);
  layoutManager.setOrientation(LinearLayoutManager.VERTICAL);

  //StaggeredGridLayoutManager layoutManager = new StaggeredGridLayoutManager(2,StaggeredGridLayoutManager.VERTICAL);

  //添加分割线
  mRecycle.addItemDecoration(new DividerItemDecoration(getApplicationContext(), DividerItemDecoration.VERTICAL_LIST));


  mRecycle.setLayoutManager(layoutManager);

  mRecycle.setItemAnimator(new DefaultItemAnimator());

  mRecycle.setAdapter(mAdapter);

  mAdapter.refresh();

  /**
   * 设置监听
   */
  mRecycle.addOnScrollListener(mController);

  mSwipeRefresh.setOnRefreshListener(mController);

 }

 @Override
 public void refresh() {
  //刷新的接口调
  mSwipeRefresh.postDelayed(new Runnable() {
   @Override
   public void run() {
    mAdapter.refresh();
    mSwipeRefresh.setRefreshing(false);
    mController.setLoadDataStatus(false);
   }
  },2000);
 }

 @Override
 public void loadMore() {
  //加载更多的接口回调
  pd = new ProgressDialog(this);
  pd.show();
  mSwipeRefresh.postDelayed(new Runnable() {
   @Override
   public void run() {
    mAdapter.add();
    //设置数据加载结束的监听状态
    mController.setLoadDataStatus(false);
    pd.dismiss();
   }
  },2000);
 }
}
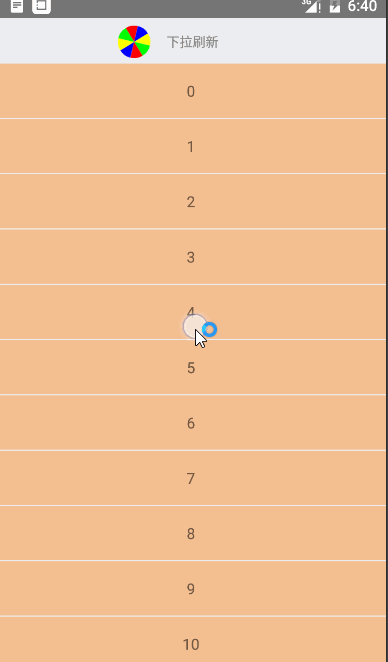
贴个效果图

第二种方式:SwipeToLoadLayout实现上拉加载和下拉刷新
该刷新控件的方式类似于Ultra-pull-to-refresh的使用方式。
如下方式添加该库:
 repositories {
  maven { url "https://jitpack.io" }
   }

 compile 'com.github.Aspsine:SwipeToLoadLayout:1.0.3'
首先我们需要自定义一个头视图和底部视图,头部试图和底部试图的用法相同,所以我们先定义一个头部视图类:
/**
 * 基础的refreshHeadView
 */
public class RefreshHeaderView extends TextView implements SwipeRefreshTrigger, SwipeTrigger {

 public RefreshHeaderView(Context context) {
  super(context);
 }

 public RefreshHeaderView(Context context, AttributeSet attrs) {
  super(context, attrs);
 }

 public RefreshHeaderView(Context context, AttributeSet attrs, int defStyleAttr) {
  super(context, attrs, defStyleAttr);
 }

 @TargetApi(Build.VERSION_CODES.LOLLIPOP)
 public RefreshHeaderView(Context context, AttributeSet attrs, int defStyleAttr, int defStyleRes) {
  super(context, attrs, defStyleAttr, defStyleRes);
 }

 @Override
 public void onRefresh() {
  //下拉到一定位置松开之后,调用此方法
  setText("refresh");

  Log.i("info","onRefresh");
 }

 @Override
 public void onPrepare() {

  //下拉之前调用此方法
  Log.i("info","onPrepare");
 }

 @Override
 public void onMove(int yScrolled, boolean isComplete, boolean automatic) {
  if (!isComplete) {
   //当前Y轴偏移量大于控件高度时,标识下拉到界限,显示“松开已刷新”
   if (yScrolled >= getHeight()) {

   } else {
    //未达到偏移量

   }
  }
  Log.i("info","onMove");
 }

 @Override
 public void onRelease() {
  //达到一定滑动距离,松开刷新时调用
  setText("onRelease");
  Log.i("info","onRelease");
 }

 @Override
 public void onComplete() {
  //加载完成之后调用此方法
  setText("complete");
  Log.i("info","onComplete");
 }

 @Override
 public void onReset() {
  //重置
  setText("onReset");
  Log.i("info","onReset");
 }
}
其需要实现接口SwipeRefreshTrigger和SwipeTrigger。
而底部需要实现SwipeTrigger和SwipeLoadMoreTrigger。
布局文件中如下使用
<RelativeLayout xmlns:android="http://schemas.android.com/apk/res/android"
 xmlns:tools="http://schemas.android.com/tools"
 android:layout_width="match_parent"
 android:layout_height="match_parent"
 android:background="#ECEDF0"
 >

 <com.aspsine.swipetoloadlayout.SwipeToLoadLayout
  android:id="@+id/swipeToLoadLayout"
  android:layout_width="match_parent"
  android:layout_height="match_parent">

  <com.mahao.alex.systemwidgetdemo.recycleView.swipetoloadlayout.RefreshHeaderView
   android:id="@+id/swipe_refresh_header"
   android:layout_width="match_parent"
   android:layout_height="wrap_content" />

  <android.support.v7.widget.RecyclerView
   android:id="@+id/swipe_target"
   android:layout_width="match_parent"
   android:layout_height="wrap_content"
   android:scrollbars="vertical" />

  <com.mahao.alex.systemwidgetdemo.recycleView.swipetoloadlayout.LoaderMoreView
   android:id="@+id/swipe_load_more_footer"
   android:layout_width="match_parent"
   android:layout_height="wrap_content"
   android:gravity="center"
   android:padding="20dp" />
 </com.aspsine.swipetoloadlayout.SwipeToLoadLayout>


</RelativeLayout>
查找控件,设置监听
swipeToLoadLayout.setOnRefreshListener(this);
swipeToLoadLayout.setOnLoadMoreListener(this);
在我们之前的代码中,加入了log信息,我们可以看一下log信息。…代表多次onMove()方法多次调用。
05-10 10:30:34.396 23814-23814/com.mahao.alex.systemwidgetdemo I/info: onPrepare
05-10 10:30:34.536 23814-23814/com.mahao.alex.systemwidgetdemo I/info: onMove
..........................................................................
05-10 10:30:34.886 23814-23814/com.mahao.alex.systemwidgetdemo I/info: onMove
05-10 10:30:34.896 23814-23814/com.mahao.alex.systemwidgetdemo I/info: onRelease
05-10 10:30:34.906 23814-23814/com.mahao.alex.systemwidgetdemo I/info: onMove
..........................................................................
05-10 10:30:35.086 23814-23814/com.mahao.alex.systemwidgetdemo I/info: onMove
05-10 10:30:35.106 23814-23814/com.mahao.alex.systemwidgetdemo I/info: onRefresh
05-10 10:30:37.116 23814-23814/com.mahao.alex.systemwidgetdemo I/info: onComplete
05-10 10:30:37.416 23814-23814/com.mahao.alex.systemwidgetdemo I/info: onMove
..........................................................................
05-10 10:30:37.516 23814-23814/com.mahao.alex.systemwidgetdemo I/info: onMove
05-10 10:30:37.916 23814-23814/com.mahao.alex.systemwidgetdemo I/info: onReset
首先会调用onPrepare()方法,onMove()方法会一直调用,只要视图有偏移,就会调用。下拉到一定距离之后,松开调用onRelaease(),回归到刷新位置时回调onRefresh(),加载完成调用onComplete(),视图开始缩小,最后隐藏之后调用onReset()
根据需求自定义视图,
定义我们的椭圆,使用自定义控件
/**
 * CircleView 圆盘控件,可以旋转
 * Created by Alex_MaHao on 2016/5/10.
 */
public class CircleView extends View {

 /**
  * 控件的半径
  */
 private int mRadius;

 /**
  * 绘制弧形的画笔
  */
 private Paint mArcPaint;

 /**
  * 绘制弧形的区域
  */
 private RectF mRange;


 private int[] colors = {Color.RED, Color.BLUE, Color.YELLOW, Color.GREEN};

 public CircleView(Context context) {
  this(context, null, 0);
 }

 public CircleView(Context context, AttributeSet attrs) {
  this(context, attrs, 0);
 }

 public CircleView(Context context, AttributeSet attrs, int defStyleAttr) {
  super(context, attrs, defStyleAttr);

  init();
 }

 private void init() {
  mArcPaint = new Paint();
  mArcPaint.setAntiAlias(true);
  mArcPaint.setDither(true);
  mArcPaint.setStyle(Paint.Style.FILL);
 }

 @Override
 protected void onMeasure(int widthMeasureSpec, int heightMeasureSpec) {
  super.onMeasure(widthMeasureSpec, heightMeasureSpec);

  int width = 0;
  int height = 0;

  int widthSize = MeasureSpec.getSize(widthMeasureSpec);
  int widthMode = MeasureSpec.getMode(widthMeasureSpec);

  int heightSize = MeasureSpec.getSize(heightMeasureSpec);
  int heightMode = MeasureSpec.getMode(heightMeasureSpec);


  if (widthMode == MeasureSpec.EXACTLY) {
   width = widthSize;
  } else {
   width = (int) TypedValue.applyDimension(TypedValue.COMPLEX_UNIT_DIP, 45, getResources().getDisplayMetrics());
  }

  if (heightMode == MeasureSpec.EXACTLY) {
   height = heightSize;
  } else {
   height = (int) TypedValue.applyDimension(TypedValue.COMPLEX_UNIT_DIP, 45, getResources().getDisplayMetrics());
  }

  //获取半径
  mRadius = Math.min(width, height) / 2;
  /**
   * 设置宽高为固定值
   */
  setMeasuredDimension(mRadius * 2, mRadius * 2);

   mRange = new RectF(0, 0, mRadius * 2, mRadius * 2);
 }


 @Override
 protected void onDraw(Canvas canvas) {

  float degree = 360/colors.length/2f;

  for (int i = 0; i < 8; i++) {
   mArcPaint.setColor(colors[i%4]);
   canvas.drawArc(mRange,-90f+degree*i,degree,true,mArcPaint);
  }

 }
}
绘制头部刷新试图
**
 * 自定义的下拉刷新控件 头部
 * Created by Alex_MaHao on 2016/5/10.
 */
public class CircleRefreshHeaderView extends RelativeLayout implements SwipeTrigger, SwipeRefreshTrigger {

 CircleView mCircleView;

 TextView mDescText;

 private ObjectAnimator anim;

 private boolean isRelease;

 public CircleRefreshHeaderView(Context context) {
  this(context, null, 0);
 }

 public CircleRefreshHeaderView(Context context, AttributeSet attrs) {
  this(context, attrs, 0);
 }

 public CircleRefreshHeaderView(Context context, AttributeSet attrs, int defStyleAttr) {
  super(context, attrs, defStyleAttr);

  initView();
 }

 /**
  * 初始化布局
  */
 private void initView() {

  int circlewidth = (int) TypedValue.applyDimension(TypedValue.COMPLEX_UNIT_DIP, 30, getResources().getDisplayMetrics());

  mCircleView = new CircleView(getContext());

  LinearLayout.LayoutParams circleParams = new LinearLayout.LayoutParams(circlewidth,circlewidth);

  mCircleView.setLayoutParams(circleParams);

  mDescText = new TextView(getContext());

  LinearLayout.LayoutParams descParams = new LinearLayout.LayoutParams(circlewidth*3, ViewGroup.LayoutParams.WRAP_CONTENT);

  descParams.gravity = Gravity.CENTER;
  descParams.setMargins(circlewidth/2,0,0,0);
  mDescText.setLayoutParams(descParams);
  mDescText.setTextSize(12);
  mDescText.setTextColor(Color.GRAY);
  mDescText.setText("下拉刷新");

  //添加线性的父布局
  LinearLayout ll = new LinearLayout(getContext());
  RelativeLayout.LayoutParams llParams = new LayoutParams(ViewGroup.LayoutParams.WRAP_CONTENT, ViewGroup.LayoutParams.WRAP_CONTENT);
  llParams.addRule(CENTER_IN_PARENT);
  ll.setLayoutParams(llParams);
  ll.setPadding(10,10,10,10);

  ll.addView(mCircleView);
  ll.addView(mDescText);

  addView(ll);
 }

 @Override
 public void onRefresh() {

  //开始刷新,启动动画
  anim = ObjectAnimator.ofFloat(mCircleView, "rotation", mCircleView.getRotation(), mCircleView.getRotation()+360f)
    .setDuration(500);
  anim.setRepeatCount(ValueAnimator.INFINITE);
  anim.setRepeatMode(ValueAnimator.RESTART);
  anim.start();

  mDescText.setText("正在加载数据");
 }

 @Override
 public void onPrepare() {
  isRelease = false;
 }

 @Override
 public void onMove(int yScroll, boolean isComplete, boolean b1) {
  if (!isComplete) {
   if (yScroll < getHeight()) {
    mDescText.setText("下拉刷新");
   } else {
    mDescText.setText("松开刷新更多");
   }

   //如果是仍在下拉状态,则圆环跟随滑动进行滚动
   if (!isRelease)
    mCircleView.setRotation(((float) yScroll) / getHeight() * 360f);
  }


 }

 @Override
 public void onRelease() {
  isRelease = true;
 }

 @Override
 public void onComplete() {
  anim.cancel();
  mDescText.setText("加载完成");
 }

 @Override
 public void onReset() {
  //重置时,将动画置为初始状态
  mCircleView.setRotation(0f);
 }
}
布局文件
<RelativeLayout xmlns:android="http://schemas.android.com/apk/res/android"
 xmlns:tools="http://schemas.android.com/tools"
 android:layout_width="match_parent"
 android:layout_height="match_parent"
 android:background="#ECEDF0"
 >

 <com.aspsine.swipetoloadlayout.SwipeToLoadLayout
  android:id="@+id/swipeToLoadLayout"
  android:layout_width="match_parent"
  android:layout_height="match_parent">

  <com.mahao.alex.systemwidgetdemo.recycleView.swipetoloadlayout.CircleRefreshHeaderView
   android:id="@+id/swipe_refresh_header"
   android:layout_width="match_parent"
   android:layout_height="wrap_content" />

  <android.support.v7.widget.RecyclerView
   android:id="@+id/swipe_target"
   android:layout_width="match_parent"
   android:layout_height="wrap_content"
   android:scrollbars="vertical" />

  <com.mahao.alex.systemwidgetdemo.recycleView.swipetoloadlayout.LoaderMoreView
   android:id="@+id/swipe_load_more_footer"
   android:layout_width="match_parent"
   android:layout_height="wrap_content"
   android:gravity="center"
   android:padding="20dp" />
 </com.aspsine.swipetoloadlayout.SwipeToLoadLayout>


</RelativeLayout>
public class SwipeToLayoutActivity extends AppCompatActivity implements OnRefreshListener, OnLoadMoreListener {


 private RecyclerView mRecycleView;

 SwipeToLoadLayout swipeToLoadLayout;

 private HomeAdapter adapter;


 @Override
 protected void onCreate(@Nullable Bundle savedInstanceState) {
  super.onCreate(savedInstanceState);
  setContentView(R.layout.activity_recycle_swipetolayout);


  swipeToLoadLayout = ((SwipeToLoadLayout) findViewById(R.id.swipeToLoadLayout));


  mRecycleView = ((RecyclerView) findViewById(R.id.swipe_target));


  adapter = new HomeAdapter();

  //设置垂直的线性布局管理器,Orientation --> VERTICAL:垂直 HORIZONTAL:水平
  LinearLayoutManager layoutManager = new LinearLayoutManager(this);
  layoutManager.setOrientation(LinearLayoutManager.VERTICAL);

//  StaggeredGridLayoutManager layoutManager = new StaggeredGridLayoutManager(2,StaggeredGridLayoutManager.VERTICAL);

  //添加分割线
  mRecycleView.addItemDecoration(new DividerItemDecoration(getApplicationContext(), DividerItemDecoration.VERTICAL_LIST));

  mRecycleView.setLayoutManager(layoutManager);

  mRecycleView.setItemAnimator(new DefaultItemAnimator());

  mRecycleView.setAdapter(adapter);

  adapter.refresh();

  /**
   * 设置下拉刷新和上拉加载监听
   */
  swipeToLoadLayout.setOnRefreshListener(this);
  swipeToLoadLayout.setOnLoadMoreListener(this);

 }


 @Override
 public void onRefresh() {
  swipeToLoadLayout.postDelayed(new Runnable() {
   @Override
   public void run() {
    adapter.refresh();
    swipeToLoadLayout.setRefreshing(false);
   }
  },2000);
 }

 @Override
 public void onLoadMore() {
  swipeToLoadLayout.postDelayed(new Runnable() {
   @Override
   public void run() {

    adapter.add();
    swipeToLoadLayout.setLoadingMore(false);
   }
  },2000);
 }
}
OK。肯定有小伙伴使用该框架时一直报错,为什么,看框架的源码,有如下一段
this.mHeaderView = this.findViewById(id.swipe_refresh_header);
 this.mTargetView = this.findViewById(id.swipe_target);
 this.mFooterView = this.findViewById(id.swipe_load_more_footer);
可以看出,作者是根据固定的id值获取的,所以在我们的布局文件中,必须使用固定的三个id。
如有需求,可移步我的github获取源码,源码在systemwidgetdemo中。
以上就是本文的全部内容,希望对大家学习Android软件编程有所帮助。
声明:本文内容来源于网络,版权归原作者所有,内容由互联网用户自发贡献自行上传,本网站不拥有所有权,未作人工编辑处理,也不承担相关法律责任。如果您发现有涉嫌版权的内容,欢迎发送邮件至:notice#yiidian.com(发邮件时,请将#更换为@)进行举报,并提供相关证据,一经查实,本站将立刻删除涉嫌侵权内容。
